Showing posts with label vellum. Show all posts

Monday, September 8, 2008

From the Road: Lesson Learned

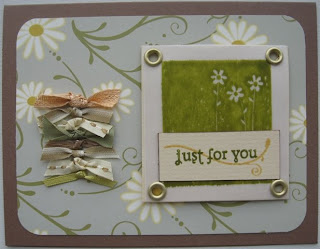
Keep all ribbon scraps!! These two cards both demonstrate this important lesson I've learned in my efforts at creating on the road. Especially this "just for you" card. The row of little knots was the perfect accent.


The negative image (from the In Any Event Stampin Up set) is stamped on vellum using classic ink from Stampin Up. The watercolor effect was unintended, but I will use it again. Unfortunately, the "thanks" sentiment did not come out clearly enough to be read. So, I covered it with a lovely piece of textured cardstock edged in brown ink and stamped using the Quickutz Sophisticate set. Finally, the vellum is attached to the same creamy cardstock with large brushed gold eyelets.


With this card I was going for understated. The paper itself is busy enough without accenting it too much. I began with the brown center - a scrap!! I knew I wanted to use the marigold yellow to tie it the paper's color theme (the back side of this double-sided paper is marigold yellow, too). But I also like to layer my paper pieces with ribbon. So I took a length each of gold and thinner brown-stitched ribbon and layered these in between the paper. The sentiment to "wish big" (from the Wish Big Stampin Up set) is stamped in pink. The white card stock is edged in the same. And, even though I was going for simple, I couldn't resist one more embellishment... the white cupcake (same set) heat embossed in the brown paper.


Check back in a couple of days to find out what the "flip flap" is all about.

Wednesday, August 27, 2008

On the road but back in Blogger city!

This has been one busy summer for me! While the previous post has a date of June 23, that's the day I created it. What took me so long to post it? The site locked up on me that night and I lost the post - or so I thought.

So, in June Bill and I went to Florida. Early July we were in Aruba - took lots of cool pics to fill a vacation scrap book. Then this month I visited with family in SC and spent time with my mom in Chicago - more pics for another vacation book!

I have actually made about a dozen cards and completed several scrapbook pages in the last few months, but with all the traveling I kept coming up with the same excuse not to post... just not enough time.

Well, tonight is my third and last night (this week anyway) on the road for work. Staying in Poughkeepsie - woo hoo! (Imagine sarcasm here.) As usual, I packed up card making paraphernalia (sp?) and managed to piece together a couple of interesting designs. What a mess I've made!


Here I am showing you just one. The others are to be part of a set I hope to blog about later this week - crossing fingers.

The base of the card is - I believe - American Crafts. Fantastic double-sided paper perfect for a not-bland card. Love the rounded corners! The flower is pieced together from various QuicKutz die cuts. I used up the small square of vellum I had left over that I've used in other projects. I like the dimension it adds to the petals. The stem and leaves are a portion of a 12" Revolution border die I cut from a rich velvety green paper. It's like the whole page is flocked.

I sure do miss my Revolution on the road, though. I had to use my QK squeeze and cut each die cut image one at a time! Talk about hand cramp!


While I wasn't watching, several of my card listings on etsy expired. I plan to relist and post the new cards I've made in the last few weeks over the next few days.

Check back regularly as I unpack and blog my crafting adventures.

Sunday, April 27, 2008

Bug me anytime

I was creative this weekend - woo hoo. I had made some cards months ago while traveling for work, but wasn't thrilled with the results. I fixed them up yesterday.

This first one I had used a wonderful paperclip in the shape of a speech bubble. It was too bulky, though, so I dipped into Bill's toolbox for his needlenose pliers to clip off the inside part of the embellishment. The phrase piece I recreated onto a new piece oh-so-carefully cutting it out using the Coluzzle blade.

The base of the card is Bazzil paper with an awesome textured pattern. I have used the same Bazzil paper in beige to look like pages in a book from a Quickutz die. The second layer is rounded off using Creative Memories corner rounder. (I have a new Stampin Up corner rounder on order with my mom. Can't wait to get it.) For flair, I included one final gold, swirly, vellum layer to the card before embellishing - rounding the corners again.


The "Bug me anytime" stamp is one in the same with the ladybug. The Prima flowers are centered with Candy Cane stickles. I used the Stamp-a-ma-jig for proper placement. The ladybug I colored in with the Stampin Up watercolor pencils and blender pens.

This ribbon was just too sweet to let it go, even as a remnant. I've used it in other projects, including the balloon card you can see in my first blog entry and available on etsy.

Check back tomorrow for the other fixer upper.

Friday, February 22, 2008

Music and Scrapbook Pages - Part 12 - Salute to Oscar and Tony

This was a great program - a Boston Pops Salute to Oscar and Tony (as in the awards for film and stage). Once I picked the paper, it really informed how I would decorate the page.


I used brown ink to distress the program pages and make them pop - almost framing them. I also carefully cut some gold sheen paper to shadow and frame the program sheets. I cut the pictures of the two singers and framed them with ribbon and string using brads for one and plastic embellishment notes for the other as "photo corners". I also used Quickutz dies cuts from the left over gold paper almost mimicking the whimsical Boston Pops logo.


The G clef border on the right side of the page was sent to me by my mom and helps add some continuity to the black notes and G clef used on the corners of the one photo.

Picking fonts to use for each page can be a very particular process. I chose what I thought was a fairly elegant and still fun font to write the narrative for this page. But, there was already so much of the white paper with shiny, gold musical staff lines and notes covered by embellishment and decoration, I didn't what the narrative to also cover the paper. So, I printed it on some sticker paper, even choosing red and blue font color for Stars and Stripes Forever.

Remember that sheet music vellum from the Gershwin page (last entry)? I used a remnant of that to additionally embellish the space behind the tickets.


With the next page, I finally discover Stickles!

Tuesday, February 19, 2008

Music and Scrapbook Pages - Part 11 - Waxing Rhapsodic

This page was all Bill. He loves Gershwin's music - especially Rhapsody in Blue. When we found out The Boston Pops was to perform an all Gershwin program - including Rhapsody - we knew we had to go. He started very simply with a sheet of darker blue paper.

Did I say ALL Bill? Well, I did suggest the sticker. And I did have to cut out this oboe he printed from an image he found online. Boy was that tedious!


The musical notes are Quickutz die cuts from small gift boxes Bill salvaged from some junk at work. He had thought I would find them useful for some creative project. He used them up for this page. Great recycler!


The picture of Gershwin he found either online or from the second program. But a great pic! The vellum with sheet music helped to fill in the blank space - and we use the left overs again later on one or two other pages.

The metal accents complete the page by reminding us of Gershwin and his piano. What a genius he was - and too young (only 38) when he died! Think what else he could have created.


For the next page - time to sing and "salute".